Crochet

Granny Squares 70s blanky

At the start of 2014 I moved from Dunedin to Wellington and stayed with my sis and her famdamily for like.. a month before I found a place.

They were so kind to house me and fed me that I decided to make them a blanket. Of course it had to go with their styles and what their house looked like to start with!

main

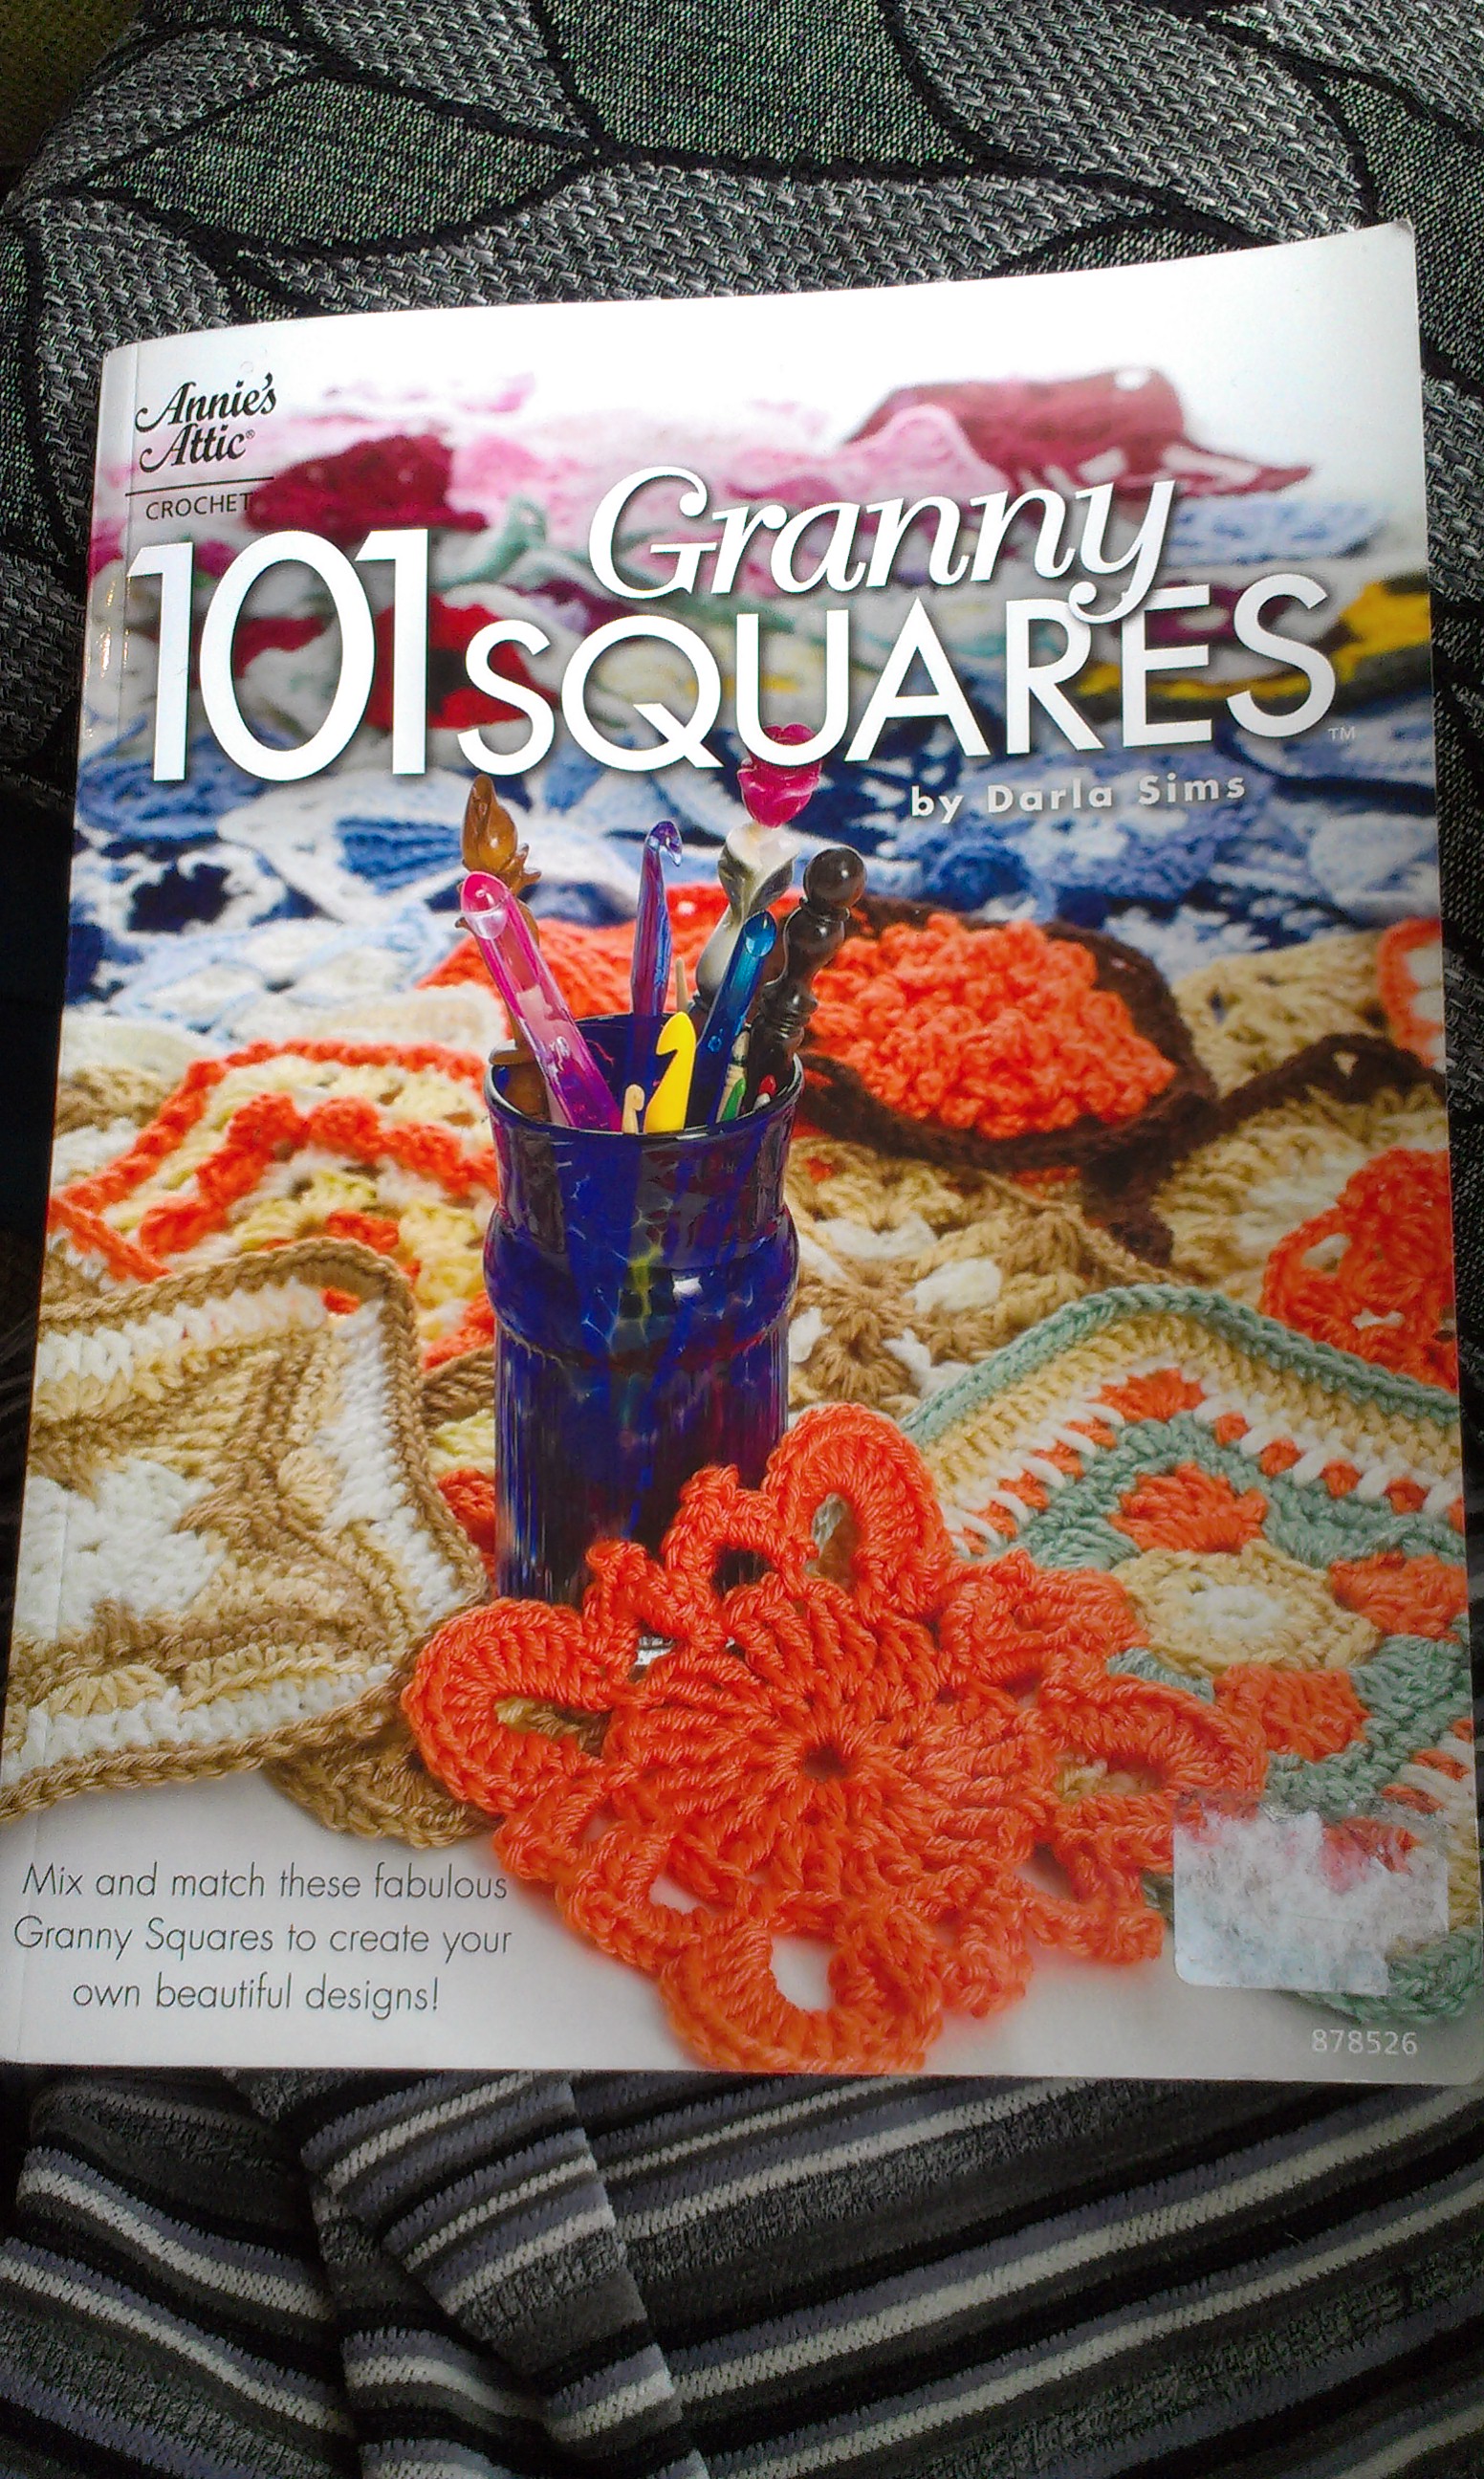
I used my 101 Granny Squares book and used 2 different squares out of it.

IMAG0744

The yarn I started off using I found in my mums stash and started making it around christmas 2013 because.. that’s what I do at my parentals place – knit and crochet!

I was actually supposed to make this really cool scarf pattern that when you rolled it up looked like a smiley face – hence the yellow and brown. However it had been attacked by moths so I shoved it in the freezer for a day to kill off anything still living inside and then went through and salvaged what I could which ended up in lots of tiny little balls of yarn.

Tiny little balls of yarn = perfect for lots of little things = granny squares, oh yes.

AND the colours are perfect for 70s.

So I found some orange as well and set out to make lots of squares.

square

I ran out of yarn pretty fast though so I had to go find some that would be about the same shades. I went to Spotlight and managed to find wool in the orange and yellow (and added in an awesome green!), but could only find the brown in acrylic.

Brown was of course my neutral colour so had to use it to do all the sewing up which I did by doing 3 chains then a single crochet through the border of a square then another 3 chains.

Unfortunately I didn’t really think about the corners of the squares so they ended up all different which you do notice when you look close enough (my bad!)

corner

I did do 2 different squares – the second type of square I only made single digits of though because I needed to fill in the corners when I ran out of coloured yarn and was putting it all together, looks ok though!! 😀

close up

Making all the squares took me.. a lot of time.. this thing isn’t even that big, imagine doing an entire bedspread.. ugh

laid out

Making the squares wasn’t the hard part though.. it was sewing it all up. That thing got SO heavy.. and then it was determining where all the pieces went and then when it was all together I had to do the border.

Wow it was heavy by the time I got to the border.. Glad I did do the scalloped border though, it’s so pretty!! I actually asked Kat how she wanted the border done and she said scalloped (I think from memory she did anyways..). So, good choice! Glad it’s over though but it was a fun project.

sideways

Sgt Peppers (Lonely Hearts Club) Turtles – Crochet

Image

From the book More Softies – http://www.penguin.com.au/softies/books

Image

Sgt Peppers Lonely Hearts Club Turtles !

What an awesome pattern. Well.. awesome design and idea, unfortunately most of it involves hand sewing to put together all the pieces and all the decorations etc and I.. dislike hand sewing.

However, I did have fun (with much frustration) at making these and watching them come together, especially putting all the crochet pieces on and seeing how they all shape up !

So,

John is yellow

Paul is blue

George is red

Ringo is pink.

Image

These little guys are made up of several pieces each. Each turtle consists of a Shell, Belly, 4 feet, and a Head/neck/front piece. All pieces are worked in rounds and are really easy to make.

index16

The feet are then sewn by being sandwiched between the belly and shell and the neck/front piece is curved around and stitched on top of the body.

Image

George and Ringo both have hats (that are also worked in rounds) and sideburns crocheted with black embroidery thread.

Ringo was the first head/neck/front that I made and in my excitement of crocheting I missed a few rows of white at the bottom of the head which turned Ringo’s head/neck/front into a head/front. Ringo does not have a neck. Which I only realised when I had put all the little guys together and it didn’t look quite right. Oops.

Image

Ringo has a huge nose to sew on and I started the face with the nose so it was a little tricky to see what it was going to look like for the rest of the face. I recommend sewing the eyes on first (so that they aren’t too far apart) and then stitching the nose on right in the centre. Ringo’s hat is made into a round bowl looking then sewn on and bunched down its at the front.

index15

George’s hat just makes me so happy, what a COOL hat. AND it has a feather. So this hat was.. believe it or not, also worked in rounds (wow how surprising) and then folded up to have 3 corners and edge stitched in white with a green feather in one corner. The pattern for the hat was quite cool because you could actually see it shaping itself as you followed the pattern.

Image

Image

John and Paul have hair crocheted in black embroidery thread. I used a 1.25mm hook for this, however that may have been slightly small as the hair looks a bit lacking so I would probably double the pattern in the future. I would have this time around as well, but I was in a rush and trying to get them all finished a couple days before Christmas (just like me to leave things to the last minute, aw yeah).

Image

When I was stitching the faces I started with John’s and I did this when I was really tired so the mustache looks a bit odd and his eyes look like they are a bit lazy haha (I only just realised this). I used stem stitch (which I had to youTube) – the basics of it it make a stitch then when you come back up it will be halfway of the stitch before so all the stitched are overlapping and make the line look a lot neater. I think stem stitch is actually pretty cool.

Image

All of them have black beads for eyes apart from John who has French knots. French knots (also had to YouTube) is when you pull the needle up where you want the knot, wrap the yarn around the needle a couple of times then push the needle back through just about where it first came out and the knot will create itself (hopefully)

Image

The edge stitching around the bottom of the shell, around the collar and up the front is all done in stem stitch. the cord they have is just a chain and then stitched to their sides.

Image

By the end of the pattern I was getting a little cocky and unfortunately didn’t read what colours go with what turtle and ended up using the white for a contrast on all of them, however Ringo was supposed to have a yellow contract and John was supposed to have a red contract (as picture at the top)

Image

All in all I think this was a win and something which will not very likely be made by me again.

Fingerless Gloves – Crochet

 A very nice and easy pattern to follow. They are so warm and comfy too !

I have made several pairs of these and the pictures below are pairs that I made for my mummy and my sister. The pattern is from the Learn to Crochet book made by Patons and I acquired it in a Spotlight store when I was working there a few years ago. this is the book which taught me the very basics of crochet and it was really good to use, I definitely recommend.

http://woolandyarn.com.au/products/book-1257-learn-to-crochet

ImageImage

Patons Jet wool

Approx 12 ply
Tension 16.5 Stitches to 10cm
Needles 5.50mm
50 Grams – 74 Metres
30% Alpaca, 70% Wool

Image

The Pattern is crocheted in 2 pieces per glove then sewn up the side seams (as you can see above with the loose yarn!

It starts off from the outside of the hand with about 25 chain stitches then works in a double crochet until you reach the thumb for which it is then shaped around. Then the sides are sewn up. Easy as pie (if you know how to crochet).

The pattern does state (from memory I think) 20 chain to begin. However, the gloves are quite short and they tend to pull up on the sides when wearing them which is why I changed it to 25 chain and makes them super comfy.

ImageImage

The Scream

The Scream

Last year I needed a gift for my friends birthday, and what better to give than the Scream?!

Can’t remember what sized wool I used but it turned out around 30cm tall (I think) I had to double the head pattern, not sure why, but it looked awfully small to me. the head is crocheted in rounds but it wasn’t stuffed just pressed so con-curve at front and concave at back.

Supposed to be stuffed with pellets so he stands up but I just used stuffing so that my friends 1-year old daughter could play with him too. Would have put up more photos but this was the only one I could find.

From the book More Softies – http://www.penguin.com.au/softies/books

Crochet Baby Blanket – Granny squares

IMAG0663

Mid 2013 I decided I wouldn’t let my yarn collection get out of hand like my fabric had gotten, so I decided that I was only allowed to have 1 box of wool. Unfortunately I then wanted to make a few soft toy type things which required different yarn from what I had. What to make to dispose of current yarn? GRANNY SQUARES !

Image101 Granny Squares by Darla Sims

This was a good reason to use my new 101 Granny Squares book as well.

I decided it would be fun to start from the beginning of the book and work my way towards the end (assuming the patterns would get harder) so I started with Square 2

I used Patons Inca wool with a 7mm hook (~14 ply) and this took about 6 balls of wool. Inca is a mixed blend 50% Wool, 30% Acrylic, 20% Alpaca 50g balls.

The blanket turned out really well, used up heaps of yarn out of my box and gave me a new appreciation for sewing together lots of granny squares – tedious and heavy, REALLY HEAVY. I gave this to my sister in law for her new baby boy William since its a perfect cot size.

Finished Blanket

Finished Blanket